
If your Windows 8 app has user-based settings, you need a place to show those values, let users change them, and save them for later use. Sometimes these are called preferences, but in Windows 8, they are called "settings".
You can see and set your settings in a Windows 8 app with Windows + I. You'll pull up a fly out dialog from the right like this:
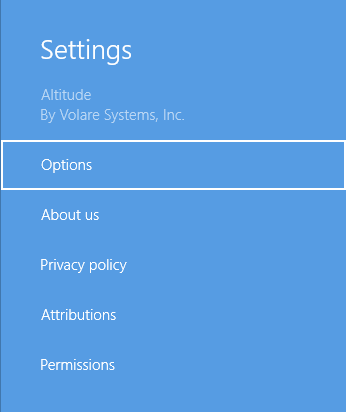
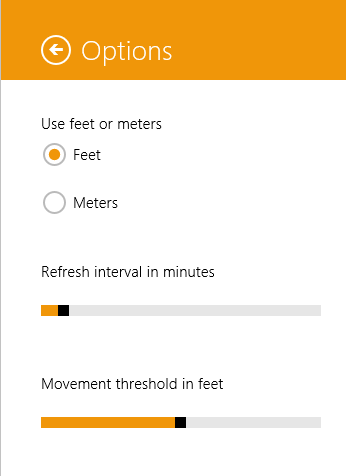
Clicking on the "Options" choice opens up the settings for the app:
Before you dive in and do this with your app, get acquainted with the Windows 8 app settings guidelines. Here's what I did for mine.
Create the Options view
Here is my options.html file. Most of this is plain old HTML. Note the ID of the outer div is "options". This could be named anything, but keep that ID in mind since we'll need it later.
<!DOCTYPE html>
<html>
<head>
    <meta charset="utf-8" />
    <title>Options</title>

    <!-- WinJS references -->
    <link href="https://volaresoftware.com/blog/Microsoft.WinJS.1.0/css/ui-light.css" rel="stylesheet" />
    <script src="//Microsoft.WinJS.1.0/js/base.js"></script>
    <script src="//Microsoft.WinJS.1.0/js/ui.js"></script>

    <!-- App references -->
    <link href="https://volaresoftware.com/blog/css/settings.css" rel="stylesheet" />
    <script src="/js/app/options.js"></script>
</head>
<body>
    <div id="options" class="win-settingsflyout" data-win-control="WinJS.UI.SettingsFlyout" data-win-options="{ width:'narrow' }">
        <div class="win-header">
            <button id="backButton" class="win-backbutton" aria-label="Back" onclick="WinJS.UI.SettingsFlyout.show()"></button>
            <div class="win-label">Options</div>
        </div>
        <div class="win-content">
            <div class="win-settings-section">
                <p>
                    <label>Use feet or meters</label>
                    <label>
                        <input id="feet" name="feetOrMeters" type="radio" value="Feet" checked />Feet
                    </label>
                    <label>
                        <input id="meters" name="feetOrMeters" type="radio" value="Meters" />Meters
                    </label>
                </p>
                <p>
                    <label for="refreshInterval">Refresh interval in minutes</label>
                    <input id="refreshInterval" name="refreshInterval" type="range" min="0" max="15" value="1" />
                </p>
                <p>
                    <label for="movementThreshold">Movement threshold in feet</label>
                    <input id="movementThreshold" name="movementThreshold" type="range" min="0" max="100" value="50" />
                </p>
            </div>
        </div>
    </div>
</body>
</html>
The CSS classes may not be familiar, but these are coming from the Windows 8 SDK CSS (ui-light.css).
The interesting parts are 1) there is no form tag or submit button (we'll see the JavaScript below that works with these values), 2) the data-win-control stuff in the top level div,
<div id="options" class="win-settingsflyout" data-win-control="WinJS.UI.SettingsFlyout" data-win-options="{ width:'narrow' }">
and 3) the onclick event for the back button that calls WinJS.UI.SettingsFlyout.show().
<button id="backButton" class="win-backbutton" aria-label="Back" onclick="WinJS.UI.SettingsFlyout.show()"></button>
The WinJS area we're working with here is the SettingsFlyout, and the show() and hide() methods display it and move it out of the way.
In modern web development, it's a venial sin to put JavaScript code in the onclick event of a button. We usually aim for unobtrusive JavaScript where all the events are wired up in JavaScript and the HTML just does the layout. I think that's a good practice, but for a back button like this, it makes the JavaScript more cluttered to have a tangential concern shoved in there. So take your pick on where you put your onclick event – the button itself or the JavaScript file.
Open the Options view
Now that we've got lovely labels and inputs to show in the Settings pane, we're ready to show it off. Add the following to your default.js file:
app.onsettings = function(e) {
    e.detail.applicationcommands = {
        "options": {title: "Options", href: "/pages/settings/options.html"},
    };
    WinJS.UI.SettingsFlyout.populateSettings(e);
};
This code will listen for the application's onsettings event (the "app" variable here = WinJS.Application) and open the options.html file in the href above. The title is what you want the user to see on the app's Settings pane. Clicking it will open your view where they can change values. The "options" part on the left side is the ID of the div it will look for in the options.html file.
At this point, you should be able to run your app and type Windows + I and see the app's settings pane, then click Options and see your app's options and the options.html input controls. Nothing will be reading or writing any data yet, so let's do that next.
Save and recall user settings for your app
There are three built-in storage areas for your Windows 8 app: local storage, roaming storage, and temporary storage. You can also use SkyDrive, Windows Azure Mobile Services, or your own homemade JSON API that reads and writes to your own database.
For app settings, I think roaming makes the most sense. Users will expect your app to remember their settings across different devices, and that's what roaming provides with no extra work on your part. The real difference between roaming and local you have to consider is, roaming storage is limited to 100k and can't hold binary data. If that won't work for your app, look into local storage, SkyDrive for files or photos, or Azure Mobile Services for structured data.
Here's the options.js file that pulls values from options.html and reads and writes values from the inputs:
(function() {
    "use strict";

    var appData = Windows.Storage.ApplicationData.current.roamingSettings;

    WinJS.UI.Pages.define("/pages/settings/options.html", {
        // This function is called whenever a user navigates to this page. It
        // populates the page elements with the app's data.
        ready: function (element, options) {
            var feetRadio = document.getElementById("feet"),
                metersRadio = document.getElementById("meters"),
                refreshIntervalRange = document.getElementById("refreshInterval"),
                movementThresholdRange = document.getElementById("movementThreshold");

            // Set settings to existing values
            if (appData.values.size > 0) {
                if (appData.values["feetOrMeters"]) {
                    setFeetOrMetersValue();
                }
                if (appData.values["refreshInterval"]) {
                    refreshIntervalRange.value = appData.values["refreshInterval"];
                }
                if (appData.values["movementThresholdInFeet"]) {
                    movementThresholdRange.value = appData.values["movementThresholdInFeet"];
                }
            }

            // Wire up on change events for settings controls
            feetRadio.onchange = function () {
                appData.values["feetOrMeters"] = getFeetOrMetersValue();
            };
            metersRadio.onchange = function () {
                appData.values["feetOrMeters"] = getFeetOrMetersValue();
            };
            refreshIntervalRange.onchange = function() {
                appData.values["refreshInterval"] = refreshIntervalRange.value;
            };
            movementThresholdRange.onchange = function() {
                appData.values["movementThresholdInFeet"] = movementThresholdRange.value;
            };
        },

        unload: function() {
            // Respond to navigations away from this page.
        },

        updateLayout: function(element, viewState, lastViewState) {
            // Respond to changes in viewState.
        }
    });

    function getFeetOrMetersValue() {
        var feetOrMetersRadio = document.getElementsByName("feetOrMeters");
        for (var i = 0; i < feetOrMetersRadio.length; i++) {
            if (feetOrMetersRadio[i].checked) {
                return feetOrMetersRadio[i].value;
            }
        }
    }

    function setFeetOrMetersValue() {
        var feetOrMetersRadio = document.getElementsByName("feetOrMeters");
        for (var i = 0; i < feetOrMetersRadio.length; i++) {
            if (feetOrMetersRadio[i].value === appData.values["feetOrMeters"]) {
                feetOrMetersRadio[i].checked = true;
            }
        }
    }
})();
I'm using the Windows.Storage.ApplicationData.current.roamingSettings (shortened to the appData variable) to read and write from roaming settings with the syntax:
appData.values["theKey"] = theValue;
It's a key value store, so if you've worked with cookies in the past, this will seem familiar.
The existing values (if there are any) are pushed into the input controls. Next, the onchange events on the options.html inputs are wired up to write the new values. You may also have other things you have to do in your app when the user changes a setting value, like redraw or hide something, etc.