
The best way to learn something is to jump right in. Best practices don't really emerge until you've found out what works and what doesn't. This is my list of things that didn't work on my four SpecFlow and WatiN projects in the last two years. Of course, I'll also talk about what did work.
Acknowledgements
First off, almost everything I know about SpecFlow/Cucumber/Gherkin I learned from Paul Rayner and pairing with with him on two projects. I'm grateful for the experience and the knowledge gained.
I've also tried to glean as much as I can from Marcus Hammarberg, Darren Cauthon, Richard Lawrence, and Brandon Satrom in their twitter feeds and articles.
What level of your app should you test?
One big issue that comes up around SpecFlow is what level of your application should you be testing – internal or external. The answer has a big impact on how you write your feature files, what side benefits you get from the feature files, and the speed of your tests.
Developer-facing
You can use SpecFlow as a BDD-style tool and do unit or light integration testing with it. I call these developer-facing feature files, because they are expressed in language internal to the application ("Then I post the form values to the AccountController"). The nice thing about this is the readability of the test from the dev side and the speed of execution, since you are explicitly testing code internals.
Business-facing
But I think this misses an opportunity to have richer language in the feature files. If the SpecFlow features are worded the way the product owner sees the app working, you are fostering a ubiquitous language between the business and the developers. You have a clearer vision of your app's external behavior expressed through concrete examples.
You end up with "Then I click the save button" or even better, "Then I save" instead of "Then I post the form values to the AccountController". The bad thing about this style of spec wording is you end up testing through UI test automation tools like WatiN. This testing style is slow and can be buggy and fragile if you aren't careful (see below for tips).
In my experience, one of the main problems in software development is getting the dev team to understand what the business wants built and why. SpecFlow is a great tool for getting both sides together to define that behavior through examples.
Furthermore, UI testing becomes much more important as web applications take on more and more JavaScript and other client-side code. Since the external behavior of the app is how the business and users will evaluate the app, I think it makes sense to test at this level.
How not to set up your test project
Acceptance tests that drive the browser are not unit tests. They are closer to integration tests, but they are even slower, since your local web server and the browser have to spin up each time and fill out forms, click buttons, etc.
Because of this, don't add SpecFlow to your current unit test project or even your current integration test project, if you separate those. Let it live in its own project with a name like MyProject.AcceptanceTests. For quick test running and CI, it's much easier to omit an entire assembly of tests, so keep these guys separate.
I find that I often want to run the faster unit tests and run the acceptance tests only around the parts of the application we are working on. I run the full suite maybe 2-5 times a week, especially before a hand-off to a stakeholder or a big demo.
How not to install SpecFlow and WatiN
Don't bother with DLL downloads or manually setting up file references. Install the SpecFlow NuGet package and the Visual Studio Extension. Let NuGet handle the assembly references and setting up the app.config for you. The VS Extension adds some nice feature file editing and right-click features to run a single test.
You'll need to decide on MSTest versus NUnit. The first comes with .NET, the later is free open source and you can add it with NuGet. If you're in a shop that heavily favors one over the other, use that. All you're using these for in the SpecFlow world is the generated code and the attributes marking your test fixtures and methods.
If you're using NUnit (the default), you'll need to be sure ApartmentState is set to "STA" in the app.config for your test project like this. If you use the NuGet download, it should take care of that.
Finally, you'll need WatiN, which can also be installed with a NuGet package. I've sometimes had to set some of the WatiN assemblies to Copy Local = true in the acceptance test project to get everything working. Kind of a hassle, but once it's set up right, you're done forever with it.
How not to set up a WebBrowser class and app.config
WatiN can run UI tests with Internet Explorer or FireFox (not Chrome, Safari, Opera, or anything else). The FireFox API didn't have parity with the IE one last time I checked, so I've gotten used to using the WatiN IE class.
However, don't reference this class directly, or all your code is IE dependent. What if the next version of WatiN supports an iPad emulator you want to use? Do you really trust your find-replace skills that much?
Instead, wrap the references with a static class, and reference that in your step definitions. Here's the one I'm using these days that gets an instance of IE in a static constructor:
namespace Helpers
{
    public static class WebBrowser
    {
        private static IE _browser;

        static WebBrowser()
        {
            _browser = new IE();
            _browser.ShowWindow(NativeMethods.WindowShowStyle.Maximize);
        }

        public static IE Current
        {
            get { return _browser; }
            set { _browser = value; }
        }

        public static string BaseUrl
        {
            get { return ConfigurationManager.AppSettings["BaseUrl"]; }
        }
    }
}
This is maximizing the IE window after it opens and adding a reference to a BaseUrl property, which is set in the app.config.
<appSettings>
    <clear/>
    <add key="BaseUrl" value="http://localhost:1234/"/>
    <!--<add key="BaseUrl" value="http://myapp.apphb.com"/>-->
</appSettings>
I use the BaseUrl to switch out the location of the test target in the step definitions (not shown above). So if I want to test locally, the BaseUrl is "http://localhost:1234/". If I want to hit the AppHarbor version, the BaseUrl "http://myapp.apphb.com/". Just change the app.config and run the tests.
How not to set up your SpecFlow Before and After attributes
SpecFlow has attributes that can be put over your step definitions for your setup and teardown code. Here are the hooks you have:
- BeforeTestRun / AfterTestRun
- BeforeFeature / AfterFeature
- BeforeScenario / AfterScenario
I've struggled with where these go before, but the last couple projects I created a BeforeAndAfter.cs class (clever, huh?), set the SpecFlow [Binding] attribute to the top of the class, then added all my before/after code.
This is a great place to put database clean ups, security code if your app has a login, any custom SpecFlow tags you've created, etc. Here's the code I used on my last project:
using System.Configuration;
using TechTalk.SpecFlow;
using WatiN.Core;

namespace Helpers
{
    [Binding]
    public class BeforeAndAfter
    {
        [BeforeTestRun]
        public static void BeforeTestRun()
        {
            // Ignore all features and scenarios when running on AppHarbor
            if (ConfigurationManager.AppSettings["Environment"] == "Test")
            {
                Assert.Ignore();
                return;
            }

            // Always login first
            Security.ILoginAsAdministrator();
        }

        [AfterTestRun]
        public static void AfterTestRun()
        {
            // Logout to be ready for next session
            Security.ILogout();

            // Close the browser and dispose
            WebBrowser.Current.Close();
            WebBrowser.Current.Dispose();

            // Reset the data to be ready for the next session
            TestData.CleanUp();
        }
    }
}
I put all my helper methods like the WebBrowser.cs and BeforeAndAfter.cs in a /Helpers folder in the acceptance test project.
How not to organize your feature files
Feature files have one or more features in them. You could put each separate feature in it's on .feature file, but that's overkill.
I used to create a new feature file for each view in the app. That probably makes sense in some cases, but this approach often misses the value of those pages. For instance, if there are 2-3 pages for an e-commerce checkout process, it's probably not that helpful to have a feature file for BillingAndShippingAddress.feature, CreditCard.feature, and Confirmation.feature. It might be helpful to developers, but it's likely non-developers on the team see the checkout process more holistically, so why not start with a Checkout.feature file? If this gets too big, split out pieces into their own logical .feature files later.
I put all my feature files in a /Features folder in the acceptance test project. It's mostly cosmetic, but it does help a little.
How not to organize your step definition files
Step definitions are the implementation of the steps in the feature files. Since I was organizing feature files by web app page, I started out doing the same with step definitions. When you try this approach, you quickly see the problem, since step definitions can and should be reused across features.
If there is a step definition "Then I go to /MyPage", the step definition might be clicking a menu, a link in the page, or just opening a URL. As you can imagine, this can be helpful in lots of different feature files, so it makes more sense to group these in a Navigation.cs file or something like that. Maybe you have a separate Menu.cs with those step definitions, or maybe you lump them in with Navigation.
How you group these is up to you. SpecFlow sees all *.cs files with a [Binding] on them as places where your step definitions could live, and it uses regex matching to find the right method. SpecFlow doesn't care if you put your methods in one class or 100 classes, but you will. So put some thought into how you group these, because it's easier to see opportunities to refactor out similar code you find within the same .cs file versus across .cs files.
This makes the file names much more generic, but I've had the most success with this style. On recent projects, my step definition files have included Forms.cs, Menu.cs, Messages.cs, Navigation.cs, Search.cs, Security.cs, and SEO.cs.
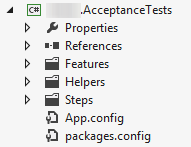
I put all my step definition code in a /Steps folder. In the end, it looks like this:
How not to code step definitions
Step definition code in each method should be brief – like a couple lines. If you've got large blocks of code, you've probably got too much going on.
Maybe you have a giant form with tons of fields and a SpecFlow table feeding you the values. You can probably get away with something like this:
public void IFillOutTheForm(Table table)
{
    foreach (var row in table.Rows)
    {
        var field = row["Field"];
        var value = row["Value"];
        switch (field)
        {
            case "Something Different":  // Put exceptions here for drop downs, date pickers, radio buttons, etc.
                WebBrowser.Current.SelectList(Find.ByName("SomethingDifferentId")).Select(value);
                break;
            default:
                WebBrowser.Current.TextField(Find.ByName(field)).Value = value;
                break;
        }
    }
}
Here, the "Something Different" case is where you would put non-textbox filling out code. But if your forms are like most business apps, there are lots of text boxes, a handful of drop downs, and a smattering of radio, checkbox, date pickers, sliders, etc. that require some different WatiN code.
Of course, if the exceptions outnumber the convention, make a separate method and see if you can factor out some common code to use somewhere else. Remember, the key to being productive with SpecFlow is reusing the step definitions, so once you start seeing duplication, look for ways to refactor to a common convention in your feature files and step definitions. It takes a while to get a critical mass of these built up, but once you do, you really start picking up speed.