Are you working in an existing code base with tons of ES5 JavaScript, and you're jealous of your friends working on greenfield projects using ES6/ES7/ES8+ or ES2015/ES2016/ES2017+ JavaScript? Here's how we moved our code base forward to start using newer features of JavaScript without losing our minds.
I've made a sample project using the ASP.NET MVC default project (and removing some of the noise). You can see all the code if you want to follow along or fork this on GitHub.
Install NPM packages
First, install node and npm, then install webpack and Babel from the command line in the web project root.
npm install --save-dev babel-core babel-loader babel-preset-env
npm install --save-dev webpack webpack-cli
When you are done, you should have a devDependencies section in your package.json file, also in the web root, that looks something like this. You will almost certainly have different versions, and you will probably have more than just this in your devDependencies section, and that's fine.
"devDependencies": {
  "babel-core": "^6.26.0",
  "babel-loader": "^7.1.4",
  "babel-preset-env": "^1.6.1",
  "webpack": "^4.4.1",
  "webpack-cli": "^2.0.13"
}
Set up Visual Studio
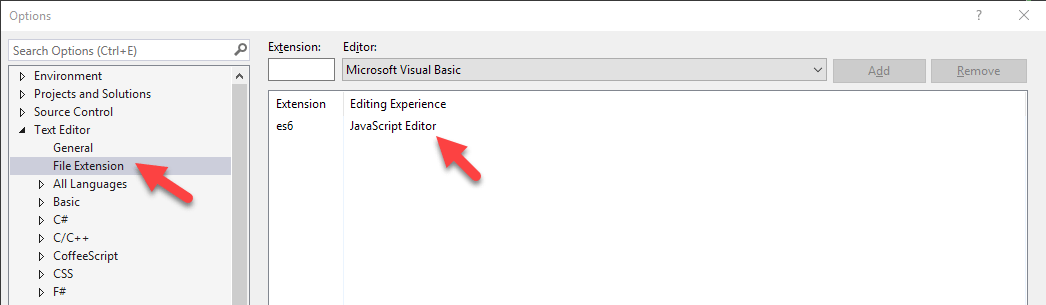
The plan is to leave old JavaScript files with the *.js extension and create new ES2015+ JavaScript files with the *.es6 extension. You can use *.es2015 or any other extension not already in use if you prefer. We just need some file marker so webpack knows which files need Babel transpilation and which don't.
In Visual Studio, you'll need to set up this new extension to use the JavaScript editor. You can do that in Tools > Options > Text Editor > File Extension. If you skip this step, Visual Studio will treat *.es6 like text files instead of JavaScript files.
Configure webpack and Babel
Let's set up the webpack.config.js file in the web root to work with the newer JavaScript syntax.
Below, the resolve section tells webpack we are using these two extensions for JavaScript files, and webpack should be looking for both *.js and *.es6 files when making bundles.
The rules section tells webpack that it needs to use Babel to load *.es6 extension files. There are a lot more Babel options you can add here. For example, want to use async/await in your *.es6 files? Add a Babel plugin for syntax-async-functions.
The isRelease flag is used to toggle between development and production settings for the build. This is using webpack 4's new mode setting, which should set up most things correctly. The devtool option uses either a quick and dirty source map or a more production-ready one.
const path = require("path");

module.exports = env => {
    const isRelease = env === "RELEASE";
    return {
        mode: isRelease ? "production" : "development",
        devtool: isRelease ? "source-map" : "cheap-module-source-map",
        entry: {
            index: "index.es6",
            about: "about.js"
        },
        output: {
            filename: "[name].js",
            path: path.resolve(__dirname, "dist"),
            publicPath: "/dist"
        },
        resolve: {
            extensions: [".js", ".es6"],
            modules: ["Scripts", "node_modules"]
        },
        module: {
            rules: [
                {
                    test: /\.es6$/,
                    exclude: /(node_modules)/,
                    use: {
                        loader: "babel-loader",
                        options: {
                            presets: ["env"]
                        }
                    }
                }
            ]
        }
    };
};
Single-Page vs. Multi-Page applications
In the entry section above, I've got two values for the two pages in this sample. index will be built using the index.es6 file as an entry point, and about will be built using about.js as the entry point. If your whole app is a SPA, you will have just one entry. If you have a multi-page application, you'll need an entry for each page. Webpack crawls the entry to bundle up all the dependencies.
We are outputting our files to a /dist folder. For simplicity, the file name will be the entry name plus ".js".
Scripts
We needs some scripts to test out the different JavaScript syntax styles.
Here is index.es6, using the new JavaScript import and templated string options.
import $ from "jquery";

$("#setInCode").text(`This value was set in code using jQuery at ${new Date().toLocaleString()}.`);
And here is about.js, using older AMD-style modules and ES5 style JavaScript.
define(["jquery"], function($) {
    $("#setInCode").text("This value was set in code using jQuery at " + new Date().toLocaleString() + ".");
});
These scripts both find an element with jQuery and set some text to it and add the date/time. We want something simple to test if our pages are working with both old and new-style JavaScript.
Script references
Since I'm using a boilerplate ASP.NET MVC project template, the _Layout.cshtml file already has:
@RenderSection("scripts", required: false)
Each page, such as Index.cshtml and About.cshtml will then reference the built-by-webpack scripts in the /dist folder with. Index.cshtml will reference /dist/index.js, and About.cshtml will reference /dist/about.js like this.
@section scripts
{
    <script src="/dist/index.js"></script>
}
Build it
So we've got our npm packages installed, the webpack.config.js file is set up, our pages call our webpack-built scripts in the/dist folder . Let's run it and test it out.
Add a new section for scripts to your package.json file:
"scripts": {
  "build": "webpack --colors --watch",
  "build:release": "webpack --colors --env RELEASE"
},
This allows us to run npm build and npm build:release as shortcuts for running webpack commands. You can name the commands anything you like.
The options show colors in the console, and for the build script, it sets up a watch on the files to re-run the build if anything changes. You'll want to use this for development. For the build:release script, we pass in —env RELEASE so the webpack.config.js script knows we want the build optimized for production.
You can also add another section to package.json to link up these build commands to the Visual Studio Task Runner Explorer.
"-vs-binding": {
  "ProjectOpened": [
    "build"
  ]
},
This will run your new build command when the project opens. Since it keeps a watch running, that should be all you need to development.
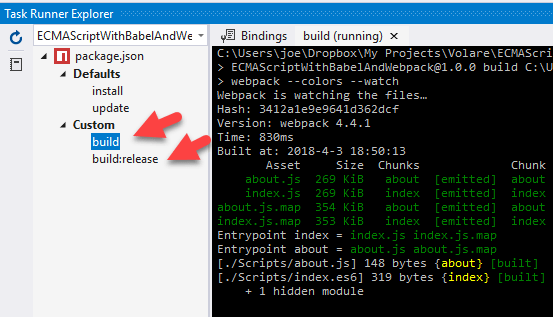
For production, you'll want to stop the build task and manually run the build:release task in the Task Runner Explorer (or run it from command line, or as a before/after build script for your ASP.NET project, or on your build server…).
Run it
Run the web app after the build command completes and you should be able to browse to the Index and About pages and see the jQuery execute in both pages the same way, even though the syntax for importing jQuery was very different for each page.
Debug it
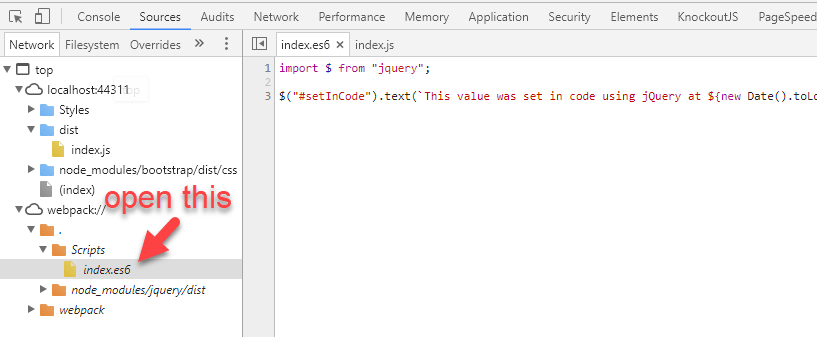
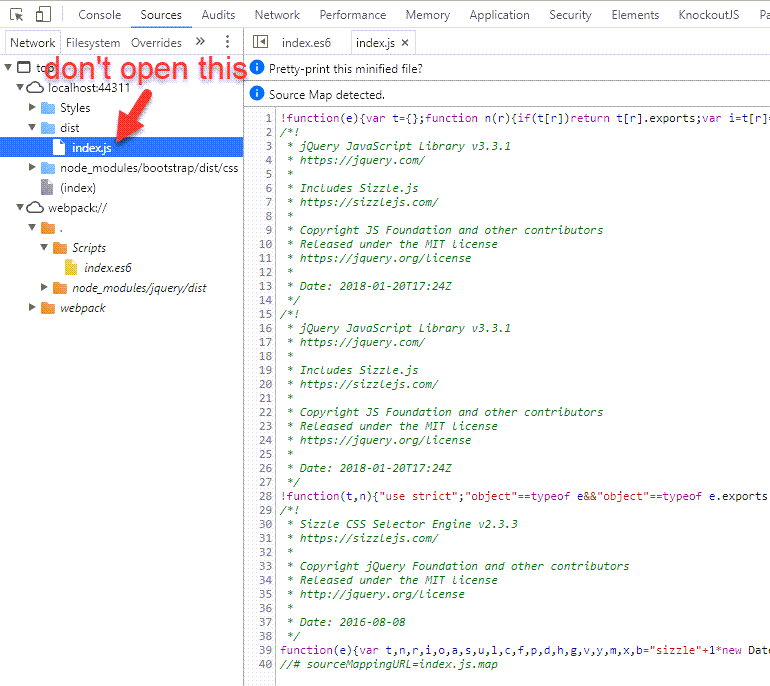
Note we are referencing index.js in Index.cshtml and not the source code file name index.es6. That's because we're not referencing the source code. We're referencing the webpack built code in the /dist folder.
Don't worry. You can still set breakpoints and watches and debug with your favorite browser dev tools when referencing the built code through source maps. When opening a file, look for the one served by webpack://. It will be the original source code seen through the source map. The other file will be the bundled/minified one.
Now what?
If you are on a project that isn't using the newer JavaScript syntax and features, talk with your team. Chances are good they would like to be using the new stuff, too.
You don't need to wait until you get put on a new project. You can start coding with the latest JavaScript syntax today, but still keep backward compatibility for your project's ES5 script.